Installation
Prerequisites for installation: Node.js 4.2.x or greater
npm install -g t2-cli
Updating Tessel 2 On-board OS/Firmware
How do I know if I need to update my T2?
t2-cli and t2-firmware are separately versioned.
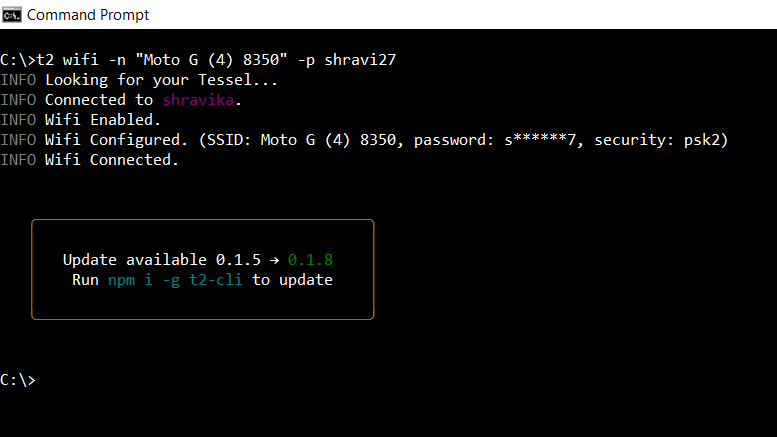
- For updating t2-cli: When a CLI command is run on an internet-connected computer, the CLI automatically checks for updates to the
t2-climodule. If an update is available, the CLI will provide the update instructions using a notifier to the user (as shown below). The CLI can be updated with a global npm re-install of the CLI using the commandnpm install -g t2-cli.The CLI only checks once per day to ensure that the CLI functioning does not slow down. - For updating t2-firmware:The user does not get update information for t2-firmware from the CLI. The most convenient and fastest way to find out if a firmware update is needed is by running the
t2 updatecommand and thet2-firmwarewill update automatically if there is a newer firmware version available. Otherwise, you can runt2 versionto get the version running on your Tessel, and thent2 update -lto see the 10 newest versions available.
Updating
Simply run t2 update. If you want to update to a specific version, run t2 update -v VERSION_NUM where VERSION_NUM is one of the versions returned by t2 update -l (like t2 update -v 0.0.6).
Setup
USB
Connecting to a Tessel 2 over USB requires no special setup.
LAN
In order to authorize the device with your computer to work over a LAN connection, call t2 provision after connecting it via USB. This will place an SSH key on the device. Use the t2 wifi command as described below to connect Tessel 2 to a local network. You should now be able to access your Tessel 2 remotely.
SSH
To connect to your Tessel 2 over SSH use the t2 root command. Before you connect, call t2 provision to authorize your computer to access your Tessel via SSH.
Usage
t2 root[--timeout]Set timeout in seconds for scanning networked Tessels. The default is5seconds.[--key]SSH key for authorization with your Tessel. Optional, only required if you have changed the keypath after your Tessel was provisioned.[--name]The name of the Tessel where the command will be executed.[--output]Enable or disable writing command output to stdout/stderr. Useful for CLI API consumers. Set totrueby default[--loglevel]Set the loglevel. It is set tobasicby default. Available options are'trace', 'debug', 'basic', 'info', 'http', 'warn', 'error'
Virtual Machine
Check out the Virtual Machine repo for instructions on how to set up the VM. All CLI commands except provision and wifi should be functional with the VM.
Usage
Specify which Tessel to use with the --name <name> option appended to any command. If --name is not specified, CLI will look for an environment variable, e.g. export TESSEL=Bulbasaur. If none of the above are specified and there is one Tessel connected over USB, this Tessel will be preferred. Finally, if there is only one Tessel available and none of the above are specified, CLI will choose that Tessel.
Starting Projects
t2 initin the current directory, create a package.json and index.js with Hello World code.
Project Files
Along with the package.json and index.js included in the t2 init process, there are some other files that may be useful for your project:
.tesselignoresimilar to .gitignore or .npmignore, this file should list any files or directories you want ignored by the T2 bundling and deployment process. This is handy when using the--fullflag, which tells T2 to bundle everything in the project directory..tesselincludethe overriding and opposite behavior of.tesselignore, this file should list any files or directories you want included with the T2 bundling and deployment process. This is handy for including non-JavaScript assets, like HTML, CSS, and images, for use within your project.- In your JavaScript program, assets listed in the
.tesselincludefile should always be accessed using__dirname(read more about__dirnamein the Node.js docs). For example, if there is a file atpublic/index.htmland it’s listed in your.tesselinclude, from your JavaScript program, you’d read it like this:fs.readFile(path.join(__dirname, "public/index.html"), "utf8", (error, contents) => ...);.
- In your JavaScript program, assets listed in the
Tessel Management
t2 keywill generate a local SSH keypair for authenticating to a Tessel. Use with thegenerateargument to generate a new local SSH keypair for authenticating to a Tessel.t2 listwill show what Tessels are available over WiFi and USB.t2 provisionwill authorize your computer to access a Tessel over SSH. (USB-connected Tessel only)t2 renamewill change the name of a Tessel.t2 rebootwill reboot your Tessel.t2 restoreRestore your Tessel to factory defaults by installing the factory version of OpenWrt-Tessel, and T2-Firmware.
Code Deployment
During code deployment, CLI looks for .tesselignore and .tesselinclude files to let it know which files it should bundle up and push over to Tessel. In the default bundling process, CLI takes the file passed into the run or push command and uses it as an entry point to build a dependency graph (similar to Browserify). Once the dependencies are known, binary modules are replaced by pre-compiled (for mips) binaries, assets are copied, and everything is tarred before sent to the awaiting Tessel.
t2 run <file>copy the file and its dependencies into Tessel’s RAM & run immediately. Use this during development of your device application.[--lan]deploy over LAN connection[--usb]deploy over USB connection[--slim]true by default, copy only files needed by the program to run[--full]the opposite of –slim, copy all the files in the project directory[--compress]true by default, compress and minify the project code prior to copying it to the device[--binopts]Arguments sent to the binary (e.g. Node.js, Python). For example, to enable ES modules in Node use--binopts="--experimental-modules"
t2 push <file>copy the file and its dependencies into Tessel’s Flash memory & run immediately. Once deployed withpushcommand, the device application will automatically run every time the Tessel restarts.[--lan]deploy over LAN connection[--usb]deploy over USB connection[--slim]true by default, copy only files needed by the program to run[--full]the opposite of –slim, copy all the files in the project directory[--compress]true by default, compress and minify the project code prior to copying it to the device[--binopts]Arguments sent to the binary (e.g. Node.js, Python). For example, to enable ES modules in Node use--binopts="--experimental-modules"
t2 eraseerase any code pushed using thet2 pushcommand
Using Wifi
t2 wifishow details about an existing WiFi connection[-l]lists the available networks[-n SSID]required, connects to the provided SSID[-p PASS]optional, connects with the given password[-s SECURITY]connects with the given security type, valid options:noneopen network, no need for a passwordwepWEP network, password requiredpskWPA Personal, password requiredpsk2WPA2 Personal, password requiredwpaWPA Enterprise, password requiredwpa2WPA2 Enterprise, password required
[--off]disconnects from the current network[--on]connects to the last configured network
Create An Access Point
t2 ap[-n SSID]required, creates a network with the given ssid[-p PASS]optional for open networks, creates a network with the given password[-s SECURITY]creates a network with the given security, valid options:noneopen network, default if no password is givenwepWEP network, password requiredpskWPA Personal, password requiredpsk2WPA2 Personal, reccomended, password required & default if password is given without security
[--off]turn off the current access point[--on]turn on the most recently used access point