When you require('tessel') within a script which is executed on Tessel 2, this loads a library which interfaces with the Tessel 2 hardware, including pins, ports, and LEDs, just like Tessel 1 (Tessel 1 hardware documentation). The code for Tessel 2’s hardware object can be found here.
Ports and pins
Tessel has two ports, A and B. They are referred to as tessel.port.B. tessel.port['B'] is also an acceptable reference style.
Tessel’s ports can be used as module ports as in Tessel 1 (e.g. accelerometer.use(tessel.port.B)), or used as flexible GPIO pins (e.g. myPin = tessel.port.A.pin[0]).
Modules
Tessel 2’s module ports can be used with Tessel modules much as in Tessel 1.
Here is an example of using the Tessel Climate module on Tessel’s port B:
var tessel = require('tessel');
var climatelib = require('climate-si7020').use(tessel.port.B);
Pin mapping
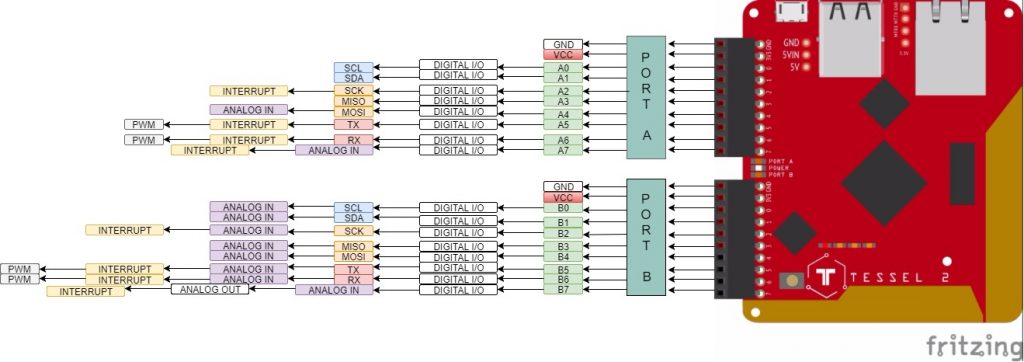
The module ports are not just for modules! They can also be used as flexible, simply addressable General purpose input-output (GPIO) pins. GPIO pins provide access for digital and analog signal lines. Available pins are exposed through the .pin, .digital, .analog, and .pwm arrays.
The pin capabilities for ports A and B are as follows:
| Port | Pin | Digital I/O | SCL | SDA | SCK | MISO | MOSI | TX | RX | Analog In | Analog Out | Interrupt | PWM |
|---|---|---|---|---|---|---|---|---|---|---|---|---|---|
| A | 0 | ✓ | ✓ | ||||||||||
| A | 1 | ✓ | ✓ | ||||||||||
| A | 2 | ✓ | ✓ | ✓ | |||||||||
| A | 3 | ✓ | ✓ | ||||||||||
| A | 4 | ✓ | ✓ | ✓ | |||||||||
| A | 5 | ✓ | ✓ | ✓ | ✓ | ||||||||
| A | 6 | ✓ | ✓ | ✓ | ✓ | ||||||||
| A | 7 | ✓ | ✓ | ✓ | |||||||||
| B | 0 | ✓ | ✓ | ✓ | |||||||||
| B | 1 | ✓ | ✓ | ✓ | |||||||||
| B | 2 | ✓ | ✓ | ✓ | ✓ | ||||||||
| B | 3 | ✓ | ✓ | ✓ | |||||||||
| B | 4 | ✓ | ✓ | ✓ | |||||||||
| B | 5 | ✓ | ✓ | ✓ | ✓ | ✓ | |||||||
| B | 6 | ✓ | ✓ | ✓ | ✓ | ✓ | |||||||
| B | 7 | ✓ | ✓ | ✓ | ✓ |
If you’re newer to hardware and these functions look like alphabet soup to you, take a look at our communication protocols documentation to get an idea of how these pins should be used.
By default, all of the pins are pulled high if not specifically set.
Pull-up and Pull-down pins
Pins 2-7 on both Ports are available for pull-up and pull-down.
The basic function of a pull-up resistor is to ensure that given no other input, a circuit assumes a default value. The ‘pullup’ mode pulls the line high and the ‘pulldown’ mode pulls it low.
Usage
// Invoke this method to set the pull mode. pullType can be - pullup, pulldown or none.
pin.pull(pullType, callback);

Example :

var tessel= require('tessel'); // Import Tessel

var pin = tessel.port.A.pin[2]; // Select pin 2 on port A

pin.pull('pullup', (error, buffer) => {
    if (error) {
        throw error;
    }

    console.log(buffer.toString('hex')); // The output would be 88. Which is an OK Signal from SAMD21
})
Digital pins
A digital pin is either high (on/3.3V) or low (off/0V). Any pin on both ports A and B, other than 3.3V and GND, can be used be used as a digital pin. All pins are pulled high to 3.3V by default.
pin.write:
Set the digital value of a pin.
pin.write(number, callback(error, buffer));
| Option | Type | Description | Required |
|---|---|---|---|
| number | Number | 0 for “low”, 1 for “high” | Yes |
| callback | Function | Called when write is complete | Yes |
| error | Error | Contains information if an error occured, otherwise null |
Yes |
| buffer | Buffer | Value written to the pin | Yes |
Example:
var tessel = require('tessel'); // Import tessel
var pin = tessel.port.A.pin[2]; // Select pin 2 on port A
pin.write(1, (error, buffer) => {
  if (error) {
    throw error;
  }

  console.log(buffer.toString()); // Log the value written to the pin
});
pin.read:
Read the digital value of a pin.
pin.read(callback(error, number));
| Option | Type | Description | Required |
|---|---|---|---|
| callback | Function | Called when read is complete | Yes |
| error | Error | Contains information if an error occured, otherwise null |
Yes |
| number | Number | 1 if “high”, 0 if “low” | Yes |
Example:
var tessel = require('tessel'); // Import tessel
var pin = tessel.port.A.pin[2]; // Select pin 2 on port A
pin.read(function(error, number) {
  if (error) {
    throw error;
  }

  console.log(number); // 1 if "high", 0 if "low"
});
pin.toggle:
Toggle the value of a digital pin. When the value of a pin is high, then it is set to low, and vice versa.
pin.toggle(callback(error, buffer));
| Option | Type | Description | Required |
|---|---|---|---|
| callback | Function | Called when action is complete | Yes |
| error | Error | Contains information if an error occured, otherwise null |
Yes |
| buffer | Buffer | Value written to the pin | Yes |
var tessel = require('tessel'); // Import tessel
var pin = tessel.port.A.pin[3]; // Select pin 3 on port A
pin.toggle((error, buffer) => {
  if (error) {
    throw error;
  }

  console.log(buffer.toString()); // Log the value written to the pin
});
Analog pins
An analog pin is a pin whose value can vary in the range between 0V and 3.3V. The analog pin API represents these this value as a percentage, between 0 and 1, where 1 stands for 3.3V.
pin.analogWrite:
Set the analog value of a pin. Enabled on pin 7 of Port B.
pin.analogWrite(number);
| Option | Type | Description | Required |
|---|---|---|---|
| number | Number | Minimum value 0, maximum value 1 | Yes |
Example:
var tessel = require('tessel'); // Import tessel
var pin = tessel.port.B.pin[7]; // Select pin 7 on port B
pin.analogWrite(0.6);  // Turn pin to 60% of high voltage
pin.analogRead:
Read the analog value of a pin. Enabled on pins 4 and 7 on Port A,and all pins on Port B. On both ports, all pins are pulled high by default, which means a pin not connected to any sort of sensor or resistor can still return a value over 0.
pin.analogRead(callback(error, number));
| Option | Type | Description | Required |
|---|---|---|---|
| callback | Function | Called when read is complete | Yes |
| error | Error | Contains information if an error occured, otherwise null |
Yes |
| number | Number | Minimum value 0, maximum value 1 | Yes |
Example:
var tessel = require('tessel'); // Import tessel
var pin = tessel.port.A.pin[4]; // Select pin 4 on port A
pin.analogRead((error, number) => {
  if (error) {
    throw error;
  }

  console.log(number); // The number is a value between 0 and 1
});
Interrupt Pins
Pins 2, 5, 6, 7 on both Ports are available for interrupts.
Interrupts allow us to register events based on state changes in a pin.
Usage
// Invoke the callback whenever the event occurs
pin.on(eventName, callback);

// Invoke the callback the first time the event occurs
pin.once(eventName, callback);
Available Events
| Event Name | Description | Notes |
|---|---|---|
| rise | Pin voltage rises | |
| fall | Pin voltage falls | |
| change | Pin voltage changes | Passes current value of pin to callback |
| high* | Pin voltage goes high | Only available via pin.once() |
| low* | Pin voltage goes low | Only available via pin.once() |
* Only one of these events may be registered at a time.
PWM pins
Tessel has four PWM pins: pins 5 and 6 on each module port.
Usage
tessel.pwmFrequency:
Set the signal frequency in hertz. 1 hertz equals 1 cycle of signal per second.
tessel.pwmFrequency(number);
| Option | Type | Description | Required |
|---|---|---|---|
| number | Number | Minimum value 1, maximum value 5000 | Yes |
Note: the pwmFrequency function must be called before pwmDutyCycle. Re-setting pwmFrequency will disable PWM output until pwmDutyCycle is called again.
pin.pwmDutyCycle:
Set the percentage amount of time the pin is active each cycle of signal.
pin.pwmDutyCycle(number);
| Option | Type | Description | Required |
|---|---|---|---|
| number | Number | Minimum value 0, maximum value 1, e.g. 0.6 | Yes |
Terms Used
The following sections use industry standard technical terms that are considered non-inclusive. They are used here in an explicitly technical manner and only to be accurate in describing these wire communication protocols. The terms are used strictly as defined here:
Master: A machine or device directly controlling another (source: Oxford Dictionary)
Slave: A device, or part of one, directly controlled by another (source: Oxford Dictionary)
I2C
An I2C channel uses the SCL and SDA pins (0 and 1 on Tessel 2). If you are unfamiliar with the I2C protocol, please see the communication protocols tutorial.
Usage
There are three different commands you can send over I2C: transfer, send, and read.
i2c.transfer
Write data to the slave device and then subsequently read data from the slave device. Can be used to read from a specific register (depending on the communication details of the slave device).
A common use of this method is to send the address of a register, then receive back the information contained in that register.
var tessel = require('tessel');

// Connect to device
var port = tessel.port.A; // Use the SCL/SDA pins of Port A
var slaveAddress = 0xDE; // Specific to device
var i2c = new port.I2C(slaveAddress); // Initialize I2C communication

// Details of I2C transfer
var bytesToSend = [0xde, 0xad, 0xbe, 0xef]; // An array,can be the address of a register or data to write (depends on device)
var numBytesToRead = 4; // Read back this number of bytes

// Send/recieve data over I2C using i2c.transfer
i2c.transfer(new Buffer(bytesToSend), numBytesToRead, function (error, dataReceived) {
  // Print data received (buffer of hex values)
  console.log('Buffer returned by I2C slave device ('+slaveAddress.toString(16)+'):', dataReceived);
});
i2c.send
Write data over I2C to the slave device without reading data back.
var tessel = require('tessel');

// Connect to device
var port = tessel.port.A; // Use the SCL/SDA pins of Port A
var slaveAddress = 0xDE; // Specific to device
var i2c = new port.I2C(slaveAddress); // Initialize I2C communication

// Details of I2C transfer
var bytesToSend = [0xde, 0xad, 0xbe, 0xef]; // An array,can be the address of a register or data to write (depends on device)

// Send data over I2C using i2c.send
i2c.send(new Buffer(bytesToSend), function (error) {
  // Print confirmation
  console.log('Wrote', bytesToSend, 'to slave device', slaveAddress.toString(16), 'over I2C.');
});
i2c.read
Read data over I2C but do not write to the slave device.
var tessel = require('tessel');

// Connect to device
var port = tessel.port.A; // Use the SCL/SDA pins of Port A
var slaveAddress = 0xDE; // Specific to device
var i2c = new port.I2C(slaveAddress); // Initialize I2C communication

// Details of I2C transfer
var numBytesToRead = 4; // Read back this number of bytes

// Read data over I2C using i2c.transfer
i2c.read(numBytesToRead, function (error, dataReceived) {
  // Print data received (buffer of hex values)
  console.log('Buffer returned by I2C slave device ('+slaveAddress.toString(16)+'):', dataReceived);
});
SPI
A SPI channel uses the SCK, MISO, and MOSI pins (2, 3, and 4 on Tessel 2). If you are unfamiliar with the SPI protocol, please see the communication protocols tutorial.
Here is an example using Tessel’s SPI protocol:
var port = tessel.port.A;
var spi = new port.SPI({
  clockSpeed: 4*1000*1000, // 4MHz
  polarity: 0, // Polarity - optional
  phase: 0, // Clock phase - optional
  chipSelect: port.pin[7] // Chip select - optional
});

spi.transfer(new Buffer([0xde, 0xad, 0xbe, 0xef]), function (error, dataReceived) {
  console.log('buffer returned by SPI slave:', dataReceived);
});
Wikipedia’s article on SPI has an excellent section on polarity (cpol) and clock phase (cpha).
UART/Serial
A UART (serial) channel uses the TX and RX pins (5 and 6 on Tessel 2). If you are unfamiliar with the UART protocol, please see the communication protocols tutorial.
Here is an example using Tessel’s UART protocol:
var port = tessel.port.A;
var uart = new port.UART({
  baudrate: 115200
});

uart.write('ahoy hoy\n')
uart.on('data', function (data) {
  console.log('received:', data);
})

// UART objects are streams!
// pipe all incoming data to stdout:
uart.pipe(process.stdout);
Power management
Board
tessel.reboot:
Power cycle the board. This will clear RAM and restart the program once reboot is complete. This can be done with the t2 reboot command as well.
tessel.reboot();
Ports
Tessel 2’s firmware turns off power to the port if a program does not require the tessel module. However, if tessel is required in the code, both will be turned on by default. It is possible to control the power to module ports with an explicit call:
var Tessel = require('tessel-export');

var tessel = new Tessel({
 ports: {
   A: false,
   B: false,
 }
});
tessel.open:
Allow power to one or both Tessel ports.
tessel.open(portName);
| Option | Type | Description | Required |
|---|---|---|---|
| portName | String | Either ‘A’ or ‘B’ | No |
Leaving out the port name will turn on power to both ports, i.e. tessel.open().
tessel.close:
Disallow power to one or both Tessel ports.
tessel.close(portName);
| Option | Type | Description | Required |
|---|---|---|---|
| portName | String | Either ‘A’ or ‘B’ | No |
Leaving out the port name will turn off power to both ports, i.e. tessel.close().
LEDs
There are 4 LEDs available on the Tessel 2, you may see them labeled on the board as ERR, WLAN, LED0, and LED1. They are available through the tessel.led object.
// an array of available LEDs
var leds = tessel.led;

// ERR - Red
var red = leds[0];

// WLAN - Amber
var amber = leds[1];

// LED0 - Green
var green = leds[2];

// LED1 - Blue
var blue = leds[3];
Each LED has a few methods for controlling it.
// Green LED
var led = tessel.led[2];

/*
* Property: isOn
* Returns: boolean (true or false) if led is on
*
* Checks the led to see if it is on or not.
*/
if (led.isOn) {
  console.log('The green LED is currently on.');
}

/*
* Method: on
* Returns: the led object (this makes it a chainable function)
*
* Turns the led ON.
*/
led.on();

/*
* Method: off
* Returns: the led object (this makes it a chainable function)
*
* Turns the led OFF.
*/
led.off();

/*
* Method: toggle
* Arguments:
* - callback: function to call once the led's value has been set and is passed an error object if one occured
*
* Toggles the current state of the led and calls the callback function once that is done.
*/
led.toggle(function (error) {
  if (error) {
    console.log('There was an error with toggling the led.', error);
  } else {
    console.log('The green led is now on OR off!');
  }
});
Button
Tessel 2’s button is not programmable.
During operation of a script, pressing the button will restart the script.
If you hold down the button while plugging in power, Tessel 2 boots into DFU mode. This is typically used to load firmware built from source.
USB Ports
USB modules do not need to be accessed through the Tessel object. See tessel-av for an example USB module.